
Picture this: It’s 9:30 PM on Christmas Eve. You’re hunched over your workbench, desperately trying to super glue the pieces of a gift box together while the adhesive stubbornly refuses to set fast enough. The print looked perfect when it came off the bed this morning, but now you’re realizing the tolerances are just a hair too loose, and you’re racing against the clock.
Yeah, that happened to me. No, I’m not over it yet.
But here’s what I learned from that frantic Christmas Eve experience: when it comes to 3D printed gift boxes, starting early isn’t just smart—it’s essential. And this year, I’m doing things differently.
Why 3D Printed Gift Boxes Are Worth the Effort
There’s something special about handing someone a gift that comes in a custom-made box. It’s not just wrapping paper they’ll toss aside—it’s a puzzle, a conversation starter, and something they can actually use again. These boxes work perfectly for gift cards, jewelry, cash, or any small item that deserves a memorable presentation.
The best part? Once your recipient opens their gift, they can reuse the box and pass it along to someone else. It’s the kind of sustainable gift packaging that keeps on giving, and honestly, that feels pretty good in a world of single-use everything.
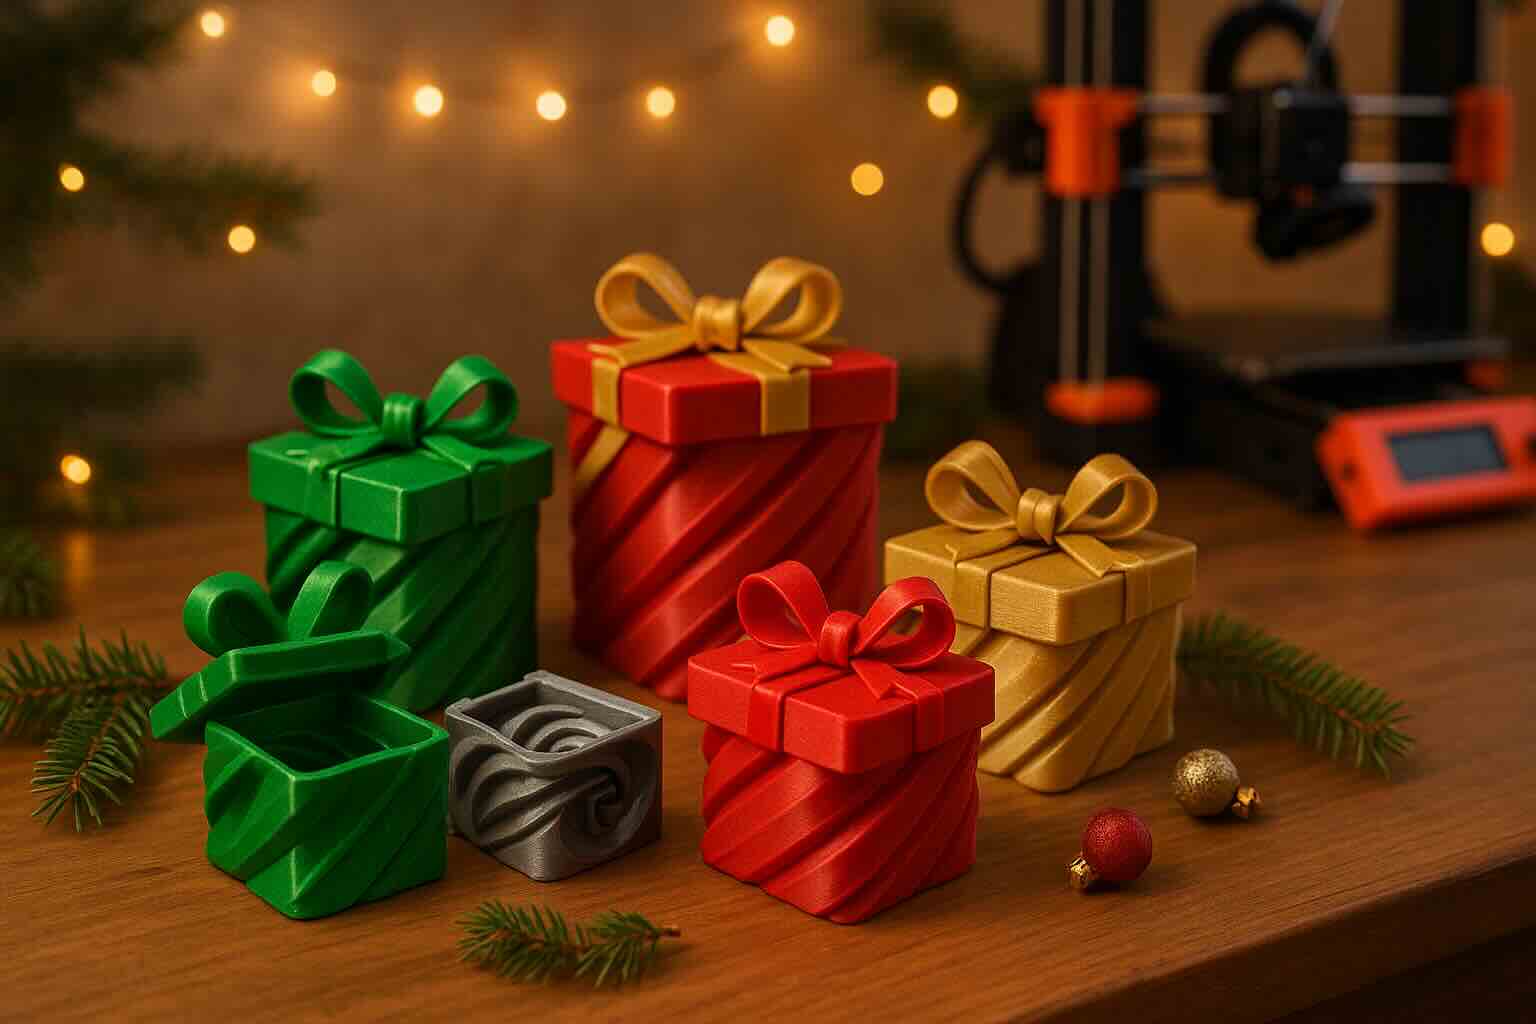
Two Standout Designs Worth Printing
After printing more gift boxes than I care to count, I’ve landed on two favorites that strike the perfect balance between impressive results and printability.
The Mechanically Locking Gift Card Box
This design wins on simplicity, and sometimes that’s exactly what you need. The locking mechanism is straightforward, the print requires minimal supports, and it comes together reliably every single time. When you’re planning to make multiple boxes (and trust me, once people see these, you’ll be making multiples), you want something that just works.
The print time is reasonable, making it perfect for those moments when you think you’ve started early but suddenly realize you need three more boxes than planned. It’s also beginner-friendly, so if you’re new to printing functional parts, this is a great place to start.
Best of all, it’s sized perfectly for gift cards—which let’s be honest, is what half of us end up giving anyway. Might as well make the presentation memorable.
The Twist Lock Present
Now this is where things get fun. The Twist Lock Present opens up a world of color possibilities with its spiral design. If you’ve been looking for an excuse to experiment with multi-color printing or show off your filament collection, this is it.
The design is more engaging for the recipient to open—there’s a satisfying twist-and-reveal moment that adds an extra layer of entertainment to the gift-giving experience. It’s eye-catching on display, and the color combinations you can create are virtually endless.
Fair warning: this one takes a bit more planning if you’re going the multi-color route, but the visual impact is absolutely worth it. I like to sketch out color combinations ahead of time so I can create a unique box for each person on my list.
One thing to note about this design—you’ll need to tension the spring that controls the latching mechanism. Getting the right amount of tension can be a bit tricky the first few times. Too loose and the box won’t stay closed; too tight and it becomes difficult to open. Plan to do a few test assemblies early on so you can dial in that sweet spot before you’re making your final versions.
Choosing Your Filament: Quality Matters When You’re Making Multiples
When you’re running a batch of 3D printed gift boxes, filament quality becomes crucial. You don’t want to be troubleshooting bed adhesion issues or dealing with inconsistent extrusion when you’ve got a dozen boxes to finish.
Polymaker Panchroma: My Go-To Choice
Polymaker’s Panchroma PLA has become my default for these projects. The quality is consistently high, and here’s what really matters when you’re printing multiples: it doesn’t require much tuning. You can load it up, use standard PLA settings, and get reliable results.
The color selection is excellent for creating unique combinations, and the price point makes it practical when you’re buying several rolls for a holiday printing session. The Panchroma Silk collection is particularly impressive—those colors shimmer and shine in a way that really elevates the finished boxes. If you want to add some festive sparkle to your gift packaging, the silk filaments are worth checking out.
Keep an eye out for their holiday sales too—they often discount festive colors around the holidays, which is perfect timing for gift box projects.
Prusament: For the Special Ones
I love Prusament, but I use it more strategically. The quality is premium, no question about it. But since Prusa Research is based in Prague, shipping costs and delivery times can add up depending on where you live. I tend to order Prusament in larger quantities to justify the international shipping, and then I save it for more personal projects or that one extra-special gift box.
If you’re going to order Prusament, plan ahead and make it count. Stock up on colors you know you’ll use, and think of it as an investment in your favorite projects.
Planning Your Color Combinations
Starting early gives you the luxury of experimentation. I like to print test pieces or even full boxes just to see how different color combinations look in person. What seems like a great pairing on screen doesn’t always translate when you’re holding the physical object.
Here’s my approach: I print lots of parts in different colors and then physically mix and match them to see what works. There’s something about holding the actual pieces together that beats looking at colors on a screen every time. For the Twist Lock Present especially, you can create some stunning effects with complementary colors or go bold with high-contrast combinations.
I’ll be honest—I should probably be better about tracking which combinations I really like. Maybe a simple photo album on my phone or a quick note would save me from reinventing the wheel each year. But for now, the hands-on experimentation approach works, even if it’s not the most organized method.
Don’t be afraid to use transparent or translucent filaments either. They can add a really nice effect, especially if there’s a small gift inside that shows through slightly.
The key is to make each box feel intentional. When someone receives a gift box in their favorite colors or a combination that just somehow feels like them, that’s when you know you’ve nailed it.
The Early Start Strategy (Or: How to Avoid Super Glue at 9:30 PM)
Let me be clear about something: you cannot start these too early. Here’s my recommended timeline:
8-10 weeks before the holiday: Start planning your gift list and what you want to give each person. This helps you figure out how many boxes you need and what sizes will work best. Once you know your numbers, start testing designs and dialing in your print settings. This is when you figure out if you need to scale anything in your slicer for better fit.
6-8 weeks out: Begin your actual production run. Print in batches, test the mechanisms, and make notes about what’s working.
4-6 weeks out: You should be mostly done printing and moving into any post-processing. This is when you realize you need “just a few more” and still have time to print them.
2-4 weeks out: Assembly, quality checks, and matching boxes to recipients. No stress, no panic, no super glue emergencies.
The batch printing approach works well here. Set up a few prints to run overnight, and suddenly you’ve got a nice collection built up without feeling like you’re constantly monitoring the printer.
Making These Boxes Last (and Pass Them On)
One of my favorite aspects of these 3d printed gift boxes is their reusability. I love printing them knowing they can be reused over and over again, hopefully making more people smile. The best part for me is coming up with the different color combinations to make each one unique. Once you get comfortable printing these designs, you might find yourself wanting to design your own custom variations—that’s when 3D printing really gets exciting.
Encourage your recipients to pass them along. There’s something nice about the idea of a well-made object continuing to serve its purpose long after you’ve sent it out into the world. Plus, it’s a conversation starter—”Where did you get this cool box?” leads to “My friend 3D printed it,” which often leads to more people getting interested in the hobby.
Practical Tips for Success
Print settings: Start with your standard PLA profile. Most of these boxes print well with 0.2mm layer heights and 15-20% infill. The mechanisms don’t need to be overbuilt—in fact, sometimes less infill gives you better flexibility in the locking parts.
Slicer adjustments: If parts are too tight or too loose, you can scale them slightly in your slicer (try 100.5% or 99.5%) to dial in that perfect fit. This is way easier than modifying the actual model files. Just remember—if you scale one part, you need to scale all the other parts by the same amount so everything still fits together properly.
Testing: Always test the mechanism before you consider a box finished. Lock it, unlock it, make sure everything moves smoothly. It’s much better to discover an issue when you still have time to reprint.
Storage: I keep finished boxes in a dedicated bin, labeled by color or size. When gift-giving time rolls around, I can quickly match boxes to presents without scrambling.
This Year Will Be Different
I’m writing this in early November, and I’ve already got a solid stack of completed gift boxes. No last-minute printing sessions. No super glue panic. No Christmas Eve workbench drama.
Starting early has transformed these from a stressful obligation into an enjoyable part of my holiday prep. I can take my time choosing colors, experimenting with combinations, and making something thoughtful for each person.
If you’ve been thinking about trying 3D printed gift boxes, don’t wait until December. Download these models now, order some filament in colors you love, and start printing. Your future self (the one who would otherwise be up late on Christmas Eve) will thank you.
And seriously—never super glue anything at 9:30 PM on Christmas Eve. Just don’t do it.
Ready to get started? Grab the Mechanically Locking Gift Card Box and the Twist Lock Present models, fire up your printer, and let’s make this holiday season a little more colorful.


